

How to Restore a Rusty Old Guitar Found in Storage: A Complete Step-by-Step Guide
Finding an old guitar hidden away in your dad’s storage can feel like discovering buried treasure. Even if the frets are covered in rust and corrosion, don’t assume the instrument is beyond saving. Many neglected guitars can be restored into excellent players with patience, proper tools, and the right repair techniques.
The biggest question is whether restoring the guitar is worth the effort. The answer depends on the condition of the neck, frets, body, bridge, and internal structure rather than surface rust alone. In many cases, cosmetic damage looks far worse than it actually is.
This guide explains exactly how to inspect, clean, repair, and restore a rusty guitar while helping you decide if it’s a worthwhile project.
Can a Rusty Guitar Be Restored?
Yes.
Surface rust on frets, tuning machines, bridge hardware, or strings is usually repairable. Rust alone rarely ruins a guitar.
However, you’ll need to inspect for:
- Neck warping
- Loose bridge
- Cracked body
- Lifted fretboard
- Water damage
- Mold
- Deep wood rot
- Broken truss rod
If these major structural issues are absent, the guitar has a very good chance of becoming playable again.
Step 1: Inspect the Entire Guitar
Before buying parts or cleaning anything, inspect every area carefully.
Neck
Check whether the neck is straight.
Look down the neck from the headstock.
Watch for:
- twists
- severe bowing
- cracks
- loose fretboard
A slightly bowed neck is normal and adjustable.
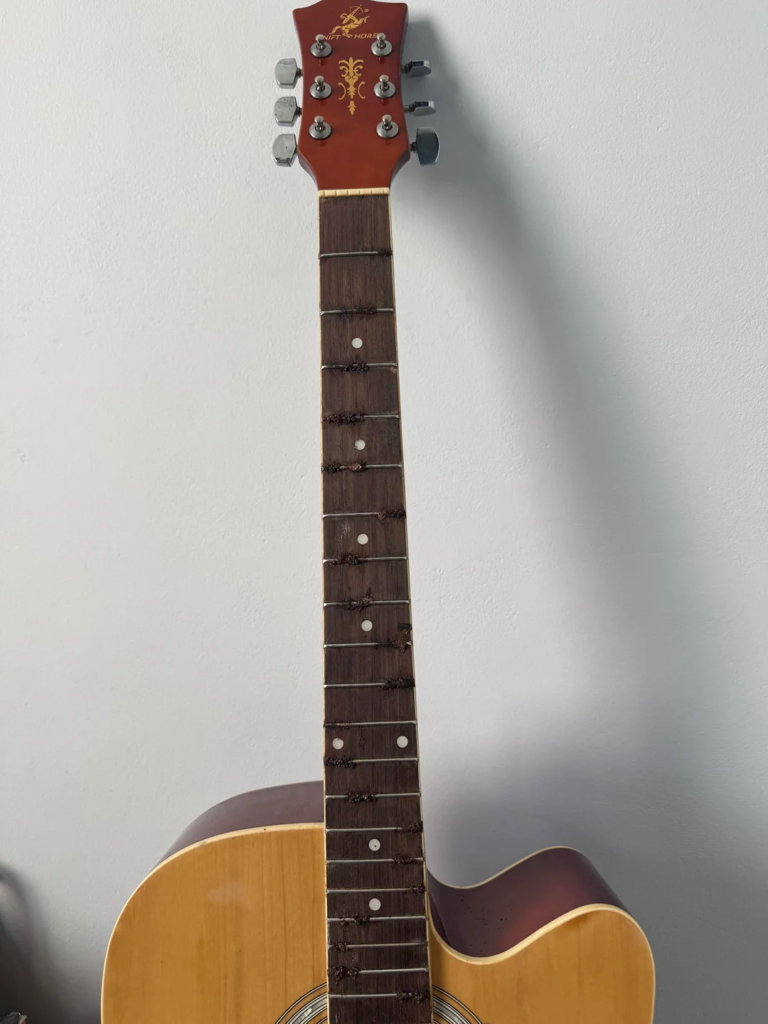
Frets
Look closely for:
- Rust
- Corrosion
- Green oxidation
- Flat worn spots
- Loose frets
- Missing frets
Light corrosion is easy to polish.
Deep pitting usually requires a fret level or complete refret.
Fingerboard
Inspect for:
- Dry wood
- Shrinking
- Cracks
- Separation
- Loose fret slots
Rosewood and ebony often become extremely dry after years in storage.
Body
Look for:
- Cracks
- Open seams
- Water damage
- Loose braces (acoustic guitars)
- Finish checking
Small finish cracks usually aren’t a problem.
Structural cracks require repair.
Hardware
Check:
- Tuners
- Bridge
- Saddle
- Nut
- Strap buttons
- Screws
Rusty hardware often cleans up surprisingly well.

Step 2: Remove the Old Strings
Old strings are almost always unusable.
Cut them off carefully.
This makes inspection much easier.
Step 3: Clean the Guitar
Dust and grime build up over years.
Use:
- Soft microfiber cloth
- Small paintbrush
- Cotton swabs
- Guitar-safe cleaner
Avoid household cleaners that contain ammonia or silicone.
Step 4: Restore Rusty Frets
Frets are one of the easiest parts to revive.
You’ll need
- 0000 steel wool (protect pickups on electric guitars)
- Fret polishing erasers
- Micro-Mesh pads
- Metal polish
Rub gently along each fret.
After polishing, wipe away all metal dust.
The result is often dramatic.
Step 5: Condition the Fingerboard
If the fretboard looks dry:
Use:
- Lemon oil (for unfinished rosewood or ebony)
- Fretboard conditioner
Do not over-oil.
One light application is enough.
Avoid oiling maple fretboards with a glossy finish.
Step 6: Clean Rusty Hardware
Rusty tuners and bridges can often be restored.
Use:
- Metal polish
- Soft toothbrush
- Cotton cloth
If rust is severe:
Replace:
- tuning machines
- bridge pins
- screws
- saddles
Replacement parts are often inexpensive.

Step 7: Check the Nut and Saddle
Inspect for:
- Chips
- Cracks
- Missing slots
- Poor string height
Replacing these parts greatly improves tuning stability and tone.
Step 8: Install New Strings
Never judge a guitar using old rusty strings.
Install a fresh set.
Choose the proper gauge recommended for your guitar.
Step 9: Adjust the Setup
Most old guitars benefit from a full setup.
This includes:
- Neck relief adjustment
- Action adjustment
- Intonation
- Nut slot inspection
- Saddle height
- Fret polishing
A proper setup can completely transform how the instrument feels.
Will the Guitar Still Sound Good?
Very likely.
The sound depends far more on:
- Wood quality
- Construction
- Neck stability
- Proper setup
- Fresh strings
Surface rust has almost no long-term effect on tone.
Many vintage guitars that sat untouched for decades become fantastic instruments after restoration.
When Is Restoration Not Worth It?
Restoration may not be economical if the guitar has:
- Broken truss rod
- Neck completely separated
- Severe water damage
- Extensive wood rot
- Large body collapse
- Multiple structural cracks
Even then, sentimental value may justify the repair.
DIY vs Professional Repair
DIY
Best for:
- Cleaning
- Rust removal
- New strings
- Fingerboard conditioning
- Hardware replacement
Professional Luthier
Recommended for:
- Neck resets
- Refrets
- Crack repair
- Truss rod issues
- Loose braces
- Bridge reglue
Estimated Restoration Cost
| Repair | Approximate Cost |
|---|---|
| New strings | Low |
| Fret polish | Low |
| Fret level | Moderate |
| Refret | High |
| Setup | Moderate |
| New tuners | Moderate |
| Crack repair | Moderate to High |
The total cost depends on the guitar’s condition and whether you perform some work yourself.
Tips Before You Start
- Take photos before disassembly.
- Work slowly and avoid harsh chemicals.
- Label removed screws and parts.
- Watch restoration tutorials if you’re new to guitar repair.
- Don’t sand the frets aggressively.
- Test everything before replacing expensive components.
Final Verdict
Finding an old guitar in storage is exciting because many neglected instruments are far more salvageable than they appear. Rusty frets, dirty hardware, and worn strings can usually be restored with careful cleaning and maintenance. The real deciding factors are the guitar’s structural integrity and neck condition.
If the neck is straight, the body is solid, and there are no major cracks, restoring the guitar is often well worth the effort. Once cleaned, restrung, and properly set up, it may surprise you with both its playability and tone. Sometimes, a forgotten guitar simply needs a second chance to sing again.
- Best Guitar Strings for Beginners in 2026
- Essential Beginner Guitar Chords Chart: Start Playing Today
- Your First Beginner Guitar Lessons: A Simple Guide
- How Often Should You Change Your Guitar Strings: A Guide
- Guitar Amp Settings Explained for New Players
