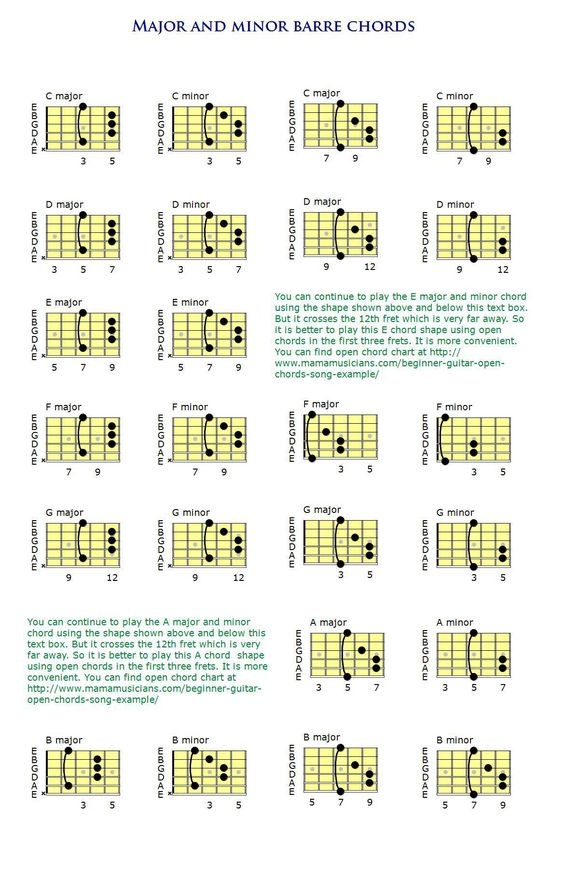
Barre chords and power chords are essential tools in a guitarist’s arsenal, allowing for versatility and power across different genres. This guide will take you through the fundamentals of these chord types, their applications, techniques, and tips for mastering them.
Barre Chords: The Essentials

1. What Are Barre Chords?
Barre chords involve using one finger (usually the index finger) to press down multiple strings across a single fret, creating a “bar” or “barre.” This technique allows you to play chords that can be moved up and down the neck to play different pitches with the same shape.
2. The Anatomy of Barre Chords
- The Barre: Your index finger acts as a capo, pressing down multiple strings across a fret.
- Chord Shapes: Common open chord shapes (like E and A) are used to form barre chords. When moved up the neck with the barre, they produce different chords.
3. Common Barre Chord Shapes
- E Major Shape: Based on the open E major chord. When barred, it creates major chords.
- Example: F Major (E major shape barred at the 1st fret)
  e|---1---|
  B|---1---|
  G|---2---|
  D|---3---|
  A|---3---|
E|---1---|- E Minor Shape: Based on the open E minor chord. When barred, it creates minor chords.
- Example: F Minor (E minor shape barred at the 1st fret)
  e|---1---|
  B|---1---|
  G|---1---|
  D|---3---|
  A|---3---|
E|---1---|- A Major Shape: Based on the open A major chord. When barred, it creates major chords.
- Example: B Major (A major shape barred at the 2nd fret)
  e|---2---|
  B|---4---|
  G|---4---|
  D|---4---|
  A|---2---|
E|-------|- A Minor Shape: Based on the open A minor chord. When barred, it creates minor chords.
- Example: B Minor (A minor shape barred at the 2nd fret)
  e|---2---|
  B|---3---|
  G|---4---|
  D|---4---|
  A|---2---|
  E|-------|
4. Techniques for Playing Barre Chords
- Finger Position: Ensure your index finger is straight and presses down firmly across all the strings. Use the side of your finger for better leverage.
- Thumb Placement: Place your thumb behind the neck, roughly in the middle, to provide counterpressure and support.
- Hand and Arm Position: Keep your wrist relatively straight to avoid strain and ensure your hand is relaxed.
5. Practice Tips
- Start Slow: Begin with the basic E and A shapes, and practice moving them up and down the neck.
- Strength and Endurance: Build finger strength through regular practice. Start with short sessions and gradually increase duration.
- Sound Clarity: Ensure all strings ring out clearly. Adjust your finger position and pressure if needed.
Power Chords: The Essentials
1. What Are Power Chords?
Power chords are simplified chords consisting of only two or three notes: the root note and the fifth (and sometimes the octave). They are neither major nor minor, making them versatile and widely used in rock, punk, metal, and more.
2. The Anatomy of Power Chords
- Two-Note Power Chord: Consists of the root and the fifth.
- Example: A5
  e|-------|
  B|-------|
  G|-------|
  D|---2---|
  A|---0---|
E|-------|- Three-Note Power Chord: Adds the octave to the root and fifth.
- Example: A5
  e|-------|
  B|-------|
  G|---2---|
  D|---2---|
  A|---0---|
  E|-------|
3. Common Power Chord Shapes
- E String Root: Root note on the E string.
- Example: G5 (root on the 3rd fret E string)
  e|-------|
  B|-------|
  G|-------|
  D|---5---|
  A|---5---|
E|---3---|- A String Root: Root note on the A string.
- Example: C5 (root on the 3rd fret A string)
  e|-------|
  B|-------|
  G|---5---|
  D|---5---|
  A|---3---|
  E|-------|
4. Techniques for Playing Power Chords
- Finger Position: Use your index finger to press the root note and your ring (or pinky) finger to press the fifth (and octave if applicable).
- Muting: Use your index finger to lightly touch the adjacent strings to prevent unwanted noise. This is especially important for high-gain settings.
5. Practice Tips
- Chord Transitions: Practice moving power chord shapes up and down the neck and between strings.
- Strumming Patterns: Work on different strumming patterns to add variety to your playing.
- Muting: Practice palm muting for a tighter, more controlled sound, often used in rock and metal.
Combining Barre and Power Chords
Both barre and power chords are essential for rhythm guitar playing and can be used interchangeably to create dynamic progressions.
- Example Progression:
  G5 (power chord)       C (barre chord)       D5 (power chord)       A (barre chord)
  e|-----------------|-----------------|-----------------|-----------------|
  B|-----------------|---5---5---5---5-|-----------------|---5---5---5---5-|
  G|-----------------|---5---5---5---5-|-----------------|---6---6---6---6-|
  D|---5---5---5---5-|---5---5---5---5-|---7---7---7---7-|---7---7---7---7-|
  A|---5---5---5---5-|---3---3---3---3-|---5---5---5---5-|---7---7---7---7-|
  E|---3---3---3---3-|-----------------|---5---5---5---5-|---5---5---5---5-|
Conclusion
Barre chords and power chords are indispensable for any guitarist. They offer the flexibility to play in various keys and add a powerful sound to your playing. By practicing the techniques outlined in this guide and incorporating these chords into your repertoire, you’ll significantly enhance your rhythm guitar skills and overall musicality. Happy playing!
- Why Guitar Chords and Staff Notation Don’t Match Each Other
- 🎶 Flute Lesson for Beginners: Learn Your First Notes Easily
- Homesteading Knowledge: Back-to-Basics Skills for Self-Reliant Living
- 🎸 Dmaj7 Guitar Chord: A Smooth and Dreamy Sound for Your Songs
- July 5th in America: The Quiet Day After the Boom