The violin, with its rich and expressive sound, requires a blend of precise bowing and adept left-hand techniques. Mastering these basics sets the foundation for advanced playing and expressive performance. Whether you’re a beginner or looking to refine your skills, understanding these techniques in depth is crucial.

Basic Bowing Techniques
Bowing is the heart of violin playing, producing the sound and controlling its quality. Here are some fundamental bowing techniques every violinist should master:
1. Holding the Bow
- Bow Grip (Franco-Belgian vs. Russian): The Franco-Belgian grip, where the fingers are more curved, is common. The Russian grip features a more extended index finger. Experiment to see which feels more natural.
- Finger Placement: The thumb is bent and placed on the underside of the frog, with the pinky resting on top of the bow, and the other fingers relaxed around the bow stick.
2. Straight Bowing
- Bow Path: Ensure the bow moves parallel to the bridge. This consistency is key to producing a clear, even tone.
- Bow Distribution: Use the full length of the bow for long notes and shorter sections for quicker notes. Practice playing long, sustained notes (whole bows) and shorter, detached notes (half bows).
3. Bow Pressure and Speed
- Pressure Control: Adjust the pressure of the bow on the strings to control dynamics. More pressure produces a louder sound, while less pressure creates a softer tone.
- Speed Variation: Slow bow speed combined with light pressure produces a soft, delicate sound. Faster bow speed with appropriate pressure results in a fuller, louder tone.
4. Basic Bowing Styles
- Detache: Separate, smooth strokes for each note. This basic stroke should be even and connected.
- Legato: Smoothly connected notes within a single bow stroke. Ensure there are no breaks between notes.
- Staccato: Short, detached notes. Practice stopping the bow between each note for clarity.
- Martelé: Accented, hammered notes produced by applying pressure before the stroke and releasing it during the stroke.
5. Bowing Exercises
- Open String Practice: Practice bowing on open strings (G, D, A, E) focusing on maintaining a straight bow path and consistent sound.
- Long Tones: Play long, sustained notes to develop control over bow speed and pressure.
- String Crossings: Practice smooth transitions between strings without disrupting the bow path or sound quality.
Basic Left-Hand Techniques
The left hand is responsible for intonation and finger placement. Mastering these basics ensures precise pitch and fluidity in playing.
1. Left-Hand Position
- Finger Placement: Place fingers on the fingerboard at precise points to produce accurate pitches. Initially, use finger tapes as guides.
- Thumb Position: The thumb should be relaxed and opposite the first or second finger, providing support without squeezing the neck.
2. Finger Independence and Strength
- Finger Lifts: Practice lifting each finger independently while maintaining a relaxed hand. This helps in developing finger strength and agility.
- Finger Taps: Tap each finger on the fingerboard in rhythm, ensuring precise placement and control.
3. Scales and Arpeggios
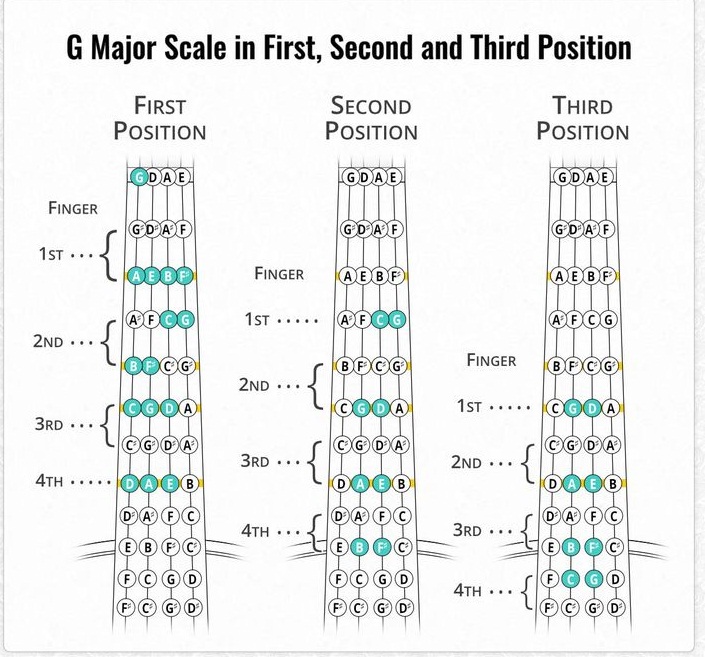
- Simple Scales: Start with basic scales like C major and G major. Focus on even finger placement and consistent intonation.
- Arpeggios: Practice arpeggios to develop finger agility and smooth string crossings.
4. Shifting
- Basic Shifting: Practice shifting between first and third positions. Slide your hand smoothly up and down the neck, listening for accurate pitch transitions.
- Position Exercises: Work on simple exercises that incorporate shifts, ensuring each position is secure and in tune.
5. Intonation and Vibrato
- Intonation Practice: Use a tuner or play alongside a piano to ensure accurate intonation. Practice playing scales slowly, focusing on pitch accuracy.
- Vibrato Introduction: Begin with basic vibrato exercises, starting with a slow, controlled movement of the wrist or arm to produce a slight oscillation in pitch.
6. Left-Hand Exercises
- Finger Patterns: Practice different finger patterns on each string to develop muscle memory and flexibility.
- Double Stops: Start with simple double stops (two notes played simultaneously) to improve finger strength and coordination.
Integrating Bowing and Left-Hand Techniques
Combining bowing and left-hand techniques is essential for fluid, expressive playing. Here are some tips to integrate these skills:
1. Coordination Exercises
- Open String Bowing with Finger Placement: Practice bowing on open strings while placing fingers on different notes, focusing on synchronization.
- Scales with Bow Variations: Play scales using different bowing techniques (detache, legato, staccato) to develop coordination between the bow and left hand.
2. Repertoire Practice
- Simple Pieces: Start with beginner pieces that incorporate both bowing and left-hand techniques. Focus on clean transitions and accurate intonation.
- Etudes: Practice etudes designed to develop specific techniques, ensuring balanced development of both hands.
3. Listening and Imitation
- Professional Recordings: Listen to recordings of professional violinists to understand tone quality and articulation.
- Imitation: Try to imitate the sound and style of the pieces you listen to, paying attention to how bowing and left-hand techniques are used.
Conclusion
Mastering the basics of bowing and left-hand techniques is fundamental to becoming a skilled violinist. Consistent practice, attention to detail, and a focus on precision will lead to significant improvements. Remember, every advanced player started with these basic steps. Keep practicing, stay patient, and enjoy the beautiful journey of learning the violin.
- Why Guitar Chords and Staff Notation Don’t Match Each Other
- 🎶 Flute Lesson for Beginners: Learn Your First Notes Easily
- Homesteading Knowledge: Back-to-Basics Skills for Self-Reliant Living
- 🎸 Dmaj7 Guitar Chord: A Smooth and Dreamy Sound for Your Songs
- July 5th in America: The Quiet Day After the Boom